Create a Message Template
If you chose
New Template
in the
Build a Message
section, then the following fields appear for defining the template:
Enter a template name.
Select whether the template is reusable or non-reusable.
Select the preferred practice location.
Enter the template message in the template body fields.
The first field is for the HTML body, and the second is for the text body. You can use the text formatting options in the template's toolbar.
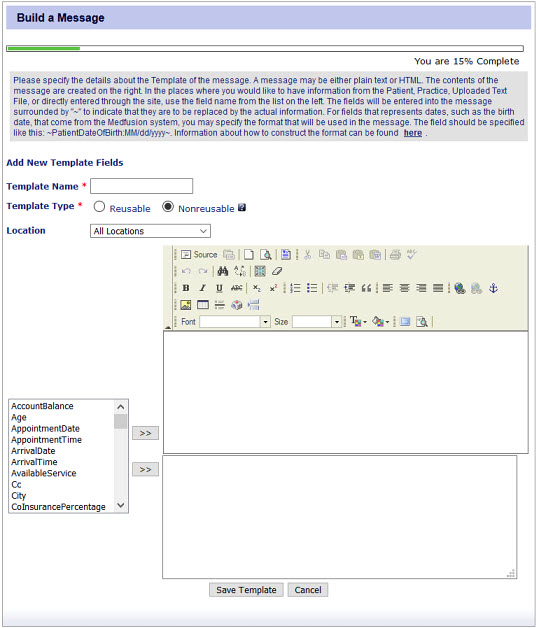
To insert placeholders for information, do the following:
Place the cursor in one of the entry fields at a position where you want the placeholder to be inserted.
Select an item from the list on the left.
Select the double arrow
to the left of the upper or lower text entry field.
The selected item is added to the field, enclosed in ~ characters to show that it is a placeholder.
The salutation of the message can be
Dear ~PatientFirstName~ ~PatientLastName~,
.
Select
Save Template
.
See also
Create a Message Base
Log on to Practice Portal
Recommendations
Explore
Create a Message Template
Patient Experience Help
Create a Recipients List
While creating your message in the Build a Message section of the Patient Messaging page, you can select various types of recipients. Select the type of recipient. Note: If you select All Patients, the message is sent to all the patients registered with the practice. Depending on the recipient type, the page displays fields for you to enter additional details. Enter the required details and select Next. Enter Details for Individual Patient Recipients To create a Practice Portal message for an individual recipient, you must enter the patient name, email, and ID. Enter Specific Criteria for Recipients You can direct a Practice Portal message to all recipients who match criteria such as gender, age, and race. Enter Details for Batch Recipients To create a Practice Portal message for a batch recipients, you must browse to a file with a list of the recipients. Parent topic: Build a Message See also Build a Message Create a Message Base Log on to Practice Portal Complete Building the Message
Patient Experience Help
Create a Message Base
While creating your message in Patient Messaging, you can form a basic structure of the message by selecting the delivery mode, practice location, message type, template, and subject of the message. Log on to Practice Portal. Select Patient Messaging. The Patient Messaging page opens displaying the Search Patient Messages section. The Patient Messaging page displays a Build a Message link in the left pane In the left pane, select Build a Message. The Build a Message section appears. The Build a Message section prompts you to enter the delivery mode, location, message type, template, and subject. Select a method for delivering the message. CAUTION: If you select Secure Comm or Email, you must ensure that your message does not include any personal health information. Practice Portal may send Secure Comm or Email messages to the patient by email, and not directly to the patient's NextGen® PxP Portal account. To ensure that personal health information is not exposed, you can use Secure Com
Patient Experience Help
Complete Building the Message
While creating your message in the Build a Message section of the Patient Messaging page, you can add attachments, set a recurrence schedule, and review and edit your message before sending it to the recipients. If you want to add attachments to your message, browse and upload them. If you do not need to add any attachments, then select Skip and Continue. The Specify Static Parameters section appears. Enter the practice and patient information, then select Next. The Specify Message Frequency section appears. The Specify Message Frequency section prompts you to specify the recurrence type, start date, and start time Select the recurrence type, start date, and end date, and then select Next. The Message Details section appears. You can review and edit your message. Select Send. Parent topic: Build a Message See also Log on to Practice Portal Build a Message Create a Recipients List
Patient Experience Help
Build a Message
You can use the Patient Messaging to create and send messages to various types of recipients as follows. Create a Message Base You can select the delivery mode, practice location, message type, template, and subject to form the basic structure of the message. Create a Message Template You can design a template for your messages, including text for HTML and text versions of the message, and placeholders for information such as the patient name. Create a Recipients List You can select various types of recipients for your message. Complete Building the Message You can add attachments, set a recurrence schedule, and review and edit your message before sending it. Parent topic: Managing Patient Messaging See also Create a Message Template Log on to Practice Portal Create a Message Base Create a Recipients List Complete Building the Message
Patient Experience Help
Search for Patient Messages
You can search for all patient messages that your practice has created during a specific period. You can also view the message history and edit and complete messages. Log on to the Practice Portal. Select Patient Messaging. The Patient Messaging page opens displaying the Search Patient Messages section. The Search Patient Messages section enables you to filter messages by status, message name, creator, creation date, message type, or template To limit the scope of your search, enter values for one or more of the items in Search Patient Messages. Select Filter messages. The messages matching your search criteria appear. Optional: To view the details of a message, select the message's row. The message details appear. You can stop sending the message or delete the message. The Message Details section displays details such as the subject, delivery mode, message type, and recipients. This section also enables you to edit parameters for the message, stop sending the message, or delete the me
Patient Experience Help
Enter Details for Batch Recipients
If the Recipient Type for a message is Batch Patient ID File Upload, do the following: To locate and select the patients list file from your computer, select Browse. The Choose Recipients section enables you select a file containing recipients and specify the delimiter used in the file Note: The practice's electronic medical records (EMR) or practice management system (PMS) can generate a patients list, which is categorized by Patient ID and contains relevant patient demographic information. This file can be in CSV or TXT format. Select one of the following file delimiters. ; (semicolon) , (comma) Optional: To enable patients to reply to your message, select Patients can reply to message. Select Upload. To map each patient information field in the uploaded file to the placeholders in the message template, select a field category from the corresponding list. The page prompts you to specify what each field in the file represents Select PatientFirstName from the list and match it to the m